For those of you who don't follow me on Pinterest, or don't hear me incessantly talk about searching for vintage plates, you might not know I've been working on creating a plate wall. Here's my Pinterest board for reference in case you have zero clue what I'm even talking about: http://pinterest.com/carolyn30/plate-wall/. As you can see, I've pinned a bunch of different types of plates (some quirky (Dr Who!!) and some very vintage) as well as ideas for placement and flow of all the plates.
There's a few reasons I love the idea of a plate wall. One, my style is very...vintage/cottage chic/earthy/bright. I feel that's a fairly accurate way to describe it. I have lots of earthy greens, off whites, dark browns, and purples throughout my apartment as well as plenty of lights that cast a soft brightness, nothing stark, but definitely not dark. A lot of my apartment really seems to be defined around my Vinyl Decal Canvas Wall Art which is definitely one of my favorite things I've made (and my most popular according to Pinterest repins). So a plate wall seemed like a great alternative decoration to just a bunch of paintings and pictures. Two, sometimes it's a fun thing to have something to collect over the years that isn't super tacky. A plate wall is something that can always grow and change over the years. You can get plates from various places you travel (which I did and will do), you can get plates with special meaning (just wait until you see what's on mine), and you can even create plates on your own (which I'm going to do very soon, so that will be a different post!).
It took me forever to turn this idea into a reality. Trying to find that first plate, that anchor plate, to start matching other plates too was proving to be very difficult. The flea market was always a bust, and same with thrift shops/Goodwill. And I wanted to at least slightly keep costs down, which has slowly become less of a priority as I find perfect plates. I haven't had time to hit up any estate sales, yard sales, and other places to track down good plates either. I wasn't too worried about it because, like I said, I knew this was going to be a lifelong project.
I have this fantastic spot in my apartment for the plate wall too.

See how there's that wall next to the door and the angled one behind my TV? Absolutely perfect for flowing up the wall and then around the corner into a curve. Right now I just have it up that side wall, but as I collect a few more plates, it'll grow over!
When I went to New York, my friend Laura and I went to Fishs Eddy, on the recommendation of my aunt and uncle, which is where we found my first two plates.


I finally had that one plate to grow around (the green one, duh), which definitely made the process easier because I could look for plates that coordinated well with it.
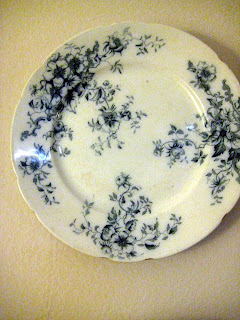
And then when I went with my friends Katie and Amy up to northern New York, we hit up an antique store and an awesome barn sale, and I found three more plates! (That little white one was only 25 cents!)


And then my mom found me a great North Carolina plate at some flea market (it is so much better than some of the cluttered tacky ones out there)

But the biggest win for my plate wall? My mom stalked eBay and found me this beauty:

That's right. Vintage 1946 NC State COLLEGE (that's how you know it's really vintage and not a fake) plate. It has the Belltower with Holladay Hall behind it, the first dorm, Watauga Hall, the Capital, the seal, oh it is SO PRETTY. These suckers are incredibly hard to come by, so big props to my mom for getting it for me.
So now that I had seven plates, I felt I had a good enough start to go ahead and hang them, and then grow from there. Thanks to the wonders of Pinterest, I learned about these babies: Invisible Disc Hangers. They come in all sorts of sizes, so I bought a bunch (you should really probably go with 4" but I got the 3" and after testing and letting a couple hang for a few days, I feel confident that they're in good shape).

I then used parchment paper to mark on the paper where the plates would hang and then put that paper against the wall and marked the spots for nails on the wall. Easy peasy!


I'm also planning to write on the back of each plate where I got it, when I got it, and any other information relating to those plates. I just need to find a porcelain pen, but for now I have a growing list of information for when I do find one. I think it'll be one of those fun things to tell people the stories of the plates when I'm 80 (if I can still remember everything). I can't wait to watch this grow over the years!
There's a few reasons I love the idea of a plate wall. One, my style is very...vintage/cottage chic/earthy/bright. I feel that's a fairly accurate way to describe it. I have lots of earthy greens, off whites, dark browns, and purples throughout my apartment as well as plenty of lights that cast a soft brightness, nothing stark, but definitely not dark. A lot of my apartment really seems to be defined around my Vinyl Decal Canvas Wall Art which is definitely one of my favorite things I've made (and my most popular according to Pinterest repins). So a plate wall seemed like a great alternative decoration to just a bunch of paintings and pictures. Two, sometimes it's a fun thing to have something to collect over the years that isn't super tacky. A plate wall is something that can always grow and change over the years. You can get plates from various places you travel (which I did and will do), you can get plates with special meaning (just wait until you see what's on mine), and you can even create plates on your own (which I'm going to do very soon, so that will be a different post!).
It took me forever to turn this idea into a reality. Trying to find that first plate, that anchor plate, to start matching other plates too was proving to be very difficult. The flea market was always a bust, and same with thrift shops/Goodwill. And I wanted to at least slightly keep costs down, which has slowly become less of a priority as I find perfect plates. I haven't had time to hit up any estate sales, yard sales, and other places to track down good plates either. I wasn't too worried about it because, like I said, I knew this was going to be a lifelong project.
I have this fantastic spot in my apartment for the plate wall too.

See how there's that wall next to the door and the angled one behind my TV? Absolutely perfect for flowing up the wall and then around the corner into a curve. Right now I just have it up that side wall, but as I collect a few more plates, it'll grow over!
When I went to New York, my friend Laura and I went to Fishs Eddy, on the recommendation of my aunt and uncle, which is where we found my first two plates.


I finally had that one plate to grow around (the green one, duh), which definitely made the process easier because I could look for plates that coordinated well with it.
And then when I went with my friends Katie and Amy up to northern New York, we hit up an antique store and an awesome barn sale, and I found three more plates! (That little white one was only 25 cents!)


And then my mom found me a great North Carolina plate at some flea market (it is so much better than some of the cluttered tacky ones out there)

But the biggest win for my plate wall? My mom stalked eBay and found me this beauty:

That's right. Vintage 1946 NC State COLLEGE (that's how you know it's really vintage and not a fake) plate. It has the Belltower with Holladay Hall behind it, the first dorm, Watauga Hall, the Capital, the seal, oh it is SO PRETTY. These suckers are incredibly hard to come by, so big props to my mom for getting it for me.
So now that I had seven plates, I felt I had a good enough start to go ahead and hang them, and then grow from there. Thanks to the wonders of Pinterest, I learned about these babies: Invisible Disc Hangers. They come in all sorts of sizes, so I bought a bunch (you should really probably go with 4" but I got the 3" and after testing and letting a couple hang for a few days, I feel confident that they're in good shape).

I then used parchment paper to mark on the paper where the plates would hang and then put that paper against the wall and marked the spots for nails on the wall. Easy peasy!


I'm also planning to write on the back of each plate where I got it, when I got it, and any other information relating to those plates. I just need to find a porcelain pen, but for now I have a growing list of information for when I do find one. I think it'll be one of those fun things to tell people the stories of the plates when I'm 80 (if I can still remember everything). I can't wait to watch this grow over the years!


