Showing posts with label wreath. Show all posts

Friday, August 31, 2012

Game Day Rag Wreath

I know, I know. I've been a terrible blogger. It's been months since I last wrote about something I baked or created or did, and I apologize because I'm sure so many of you have been lost without me (ha. right.). But today is a new day and it's time to get back into the swing of blogging! And first up is a Game Day Wreath!

I really have discovered a slight obsession with wreaths. I don't think my front door can ever be bare again! But hopefully after this wreath, I won't have to make one for awhile (unless someone else wants me to make one for them) because I have one for all seasons...including football!
Yes, I know this is a super old picture of the stadium, but it's one of my faves that I have
I don't think it's any secret that I'm an NC State fan. Born and bred until the day I die. I also am a HUGE football fan. I really wanted to make a wreath to put up on my door on game days, and I've seen a bunch of rag wreaths on Pinterest and I loved the way they looked, so I thought that would be the perfect direction to take, even though I knew it would be quite the time commitment.

Finding the basic fabrics and wreath form were easy. I went with the 16 inch 4 layer-wire wreath form, and I got a yard each of white, red, and red gingham cotton fabrics. I wanted the wreath to have a little bit of a vintage feel (football is well over 150 years old!) which is why I went with the gingham for a pattern break. BUT I wasn't done yet with my fabric selection.


The dream was to have an NC State patterned fabric also in the mix, but unfortunately all the local fabric stores had no NC State fabric. Well, one had a fleece fabric, but that was not going to work for this project. So thus began the online search. There were a lot of terrible NC State fabrics. A lot of them had old logos I wasn't a fan of, and quite a few had a ton of black and I didn't really want a lot of black in my wreath...it's not "we're the RED and WHITE from State and we know we are the BEST!" for nothing! But then on eBay I found the best vintage fabric! It had the seal with the Bell Tower, and most importantly it had Tuffy, the strutting wolf logo that I LOVE.


I got a yard of that fabric, so all-in-all I had four yards of fabric...and just to warn you if you're thinking of making one, yes, I did use just about all of it. 

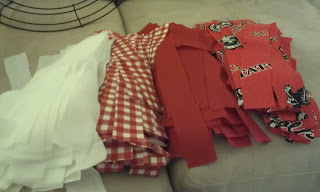
I sat down and got to work. I cut each fabric into 1 inch by 9 inch strips. And I ended up with hundreds and hundreds of strips!

To resist any temptation to make the wreath uniform, since I really just wanted it to be a mish-mash, I tossed the strips together so I could just pull from the top as I tied them on!

With season one of Arrested Development on (side note: I am SO pumped for the new season next year!) I spent hours and hours tying. Literally. I got through half the first season (that's about 5 hours). I tied them in a square knot, starting on the inner ring and working my way to the outermost ring. There were eight "sections" in the ring so I went by section rather than row. I was kind of concerned the fabric would be too thin to stay up and not be all droopy, but when I tested a couple strips they worked perfectly!
I know this technically isn't the inner ring, but I took the picture before I changed my method!
When I was finally done, I had...THIS!


It's just so fun! And fluffy! And quite huge. I was no expecting it to be that big, but I guess using all that fabric really would have led to it. I also used one of the magnetic wreath holders because a typical wreath holder would 1) ruin the aesthetic and 2) put it at a spot that would cover my apartment number or peep hole...two things that are very important. You don't really see the NC State stuff on the specialty fabric until you're up close, but I think it's pretty obvious it's an NC State wreath! I can't wait to have this on my door on game days!!

Sunday, April 8, 2012

Spring (and Summer?) Wreath

I took my winter wreath down about a month or so ago because the form was starting to sag way too much, plus, considering how warm it's been here lately, it just seemed wrong having it up even though I hadn't made one for the spring yet. So my wreath hanger just kind of stayed lonely on my door for awhile...until today!

I pinned this wreath on Pinterest awhile ago because I just loved the vintagey vibe to it, and every time I looked at it on my board, it just made me happy. I finally got around to buying my supplies, and with a three day weekend, I knew I had the couple hours to devote to making it. Since it's already well into spring, this may end up being my wreath for both spring and summer. We'll see if I decide to be super productive in a few months because my other wreath idea will be very time consuming.

I got it in my head awhile ago, that I definitely wanted to keep with the stripe fabric like my inspiration wreath, but there was just something in my head screaming "Seersucker!!" I was a bit worried that I would have this idea and not be able to find the fabric I really wanted. I saw it online at Jo-Ann's, but I wasn't sure if I'd be able to find it in the actual store. Luckily, I walked in, and found my way straight to it! I picked up a yard of the lime green seersucker, which ended up being more than plenty of fabric (it's about 42" wide, so a yard was plenty). I then went over to the felt fabric sheets and choose some colors for my flowers. It was a little difficult because I didn't want something too bright or too dark, or too not coordinating. I decided to get a dark brown for the leaves, a tan for one of the flowers, and then use some of my leftover white felt for two of the other flowers. Unfortunately, they didn't have the right size straw wreath form, so I found my 18" wreath at Michaels. Overall, the project probably cost me about $10 and took about 2 hours (but part of that might have been my constant distraction of watching Friday Night Lights).

You can do whatever size wreath you want, I just like mine to be a bit bigger for my door, and 18" turned out to be the perfect size.


For the felt sheets, you'll need 1 for the color of your leaves, two for one flower, and four for the other two flowers (or 2 per flower if you do three different colors). You'll also need pins for securing everything to the wreath.

You'll want to cut your fabric into three inch wide strips. I wouldn't cut all of the fabric at first, just cut about 6 or 7 strips and then after putting some on your wreath, cut more as needed. This way, you'll have uncut extra fabric for some other project you may want to use it for. 


Using the pins, pin the end of the fabric on the back of the wreath, at a slight angle, and then start wrapping around the wreath! Just remember to pin each end as you go, overlap it, and pull the fabric tight so it fits snugly to the form. 


Once that's completed, it's time for the felt flowers! You can either freehand everything if you're a master with scissors, or use templates. For my leaves, I decided to do freehand since they're pretty straight forward. I was able to get all six leaves from one felt sheet. If you want more leaves, you'll probably need an extra sheet.


I decided to make myself a template for the flowers because otherwise my perfectionist self would have had to run out for a lot more felt. (This was about my third attempt to get a template I liked, so it's a good thing I decided to do that!) You'll want two big petals, two medium, and two small per flower.


Then you'll fold each petal in half, and then in half again, and pin to the wreath! 


I pinned the two big petals next to each other, and then the medium ones on the other side, and the small ones in the middle. For the two white flowers, since they were on the edge, I made sure the big petals were on the outside edges of the flower cluster. And then I fluffed them so they looked nice and pretty! You can do the flowers with more or less petals or other sizes, it's really all your preference, this is just how I chose to do mine. Then I pinned two leaves under each flower and the wreath was completed!


It definitely brightens up my door!

Sunday, November 27, 2011

Felt Ruffle Christmas Wreath

So my wreath obsession continues!

Now that Thanksgiving has come and gone, I needed to try to get my apartment in the Christmas spirit (which is made more difficult by the 70 degree weather outside). I found this awesome looking ruffle wreath on Pinterest (http://www.designsponge.com/2009/12/diy-project-kristens-ruffly-felt-wreath.html) that I really wanted to make.

In the instructions, they say to use a 12inch styrofoam wreath, but the problem is that it's way too small for my door. You wouldn't be able to see my apartment number, and I wouldn't be able to see out the peep hole! Both important things. So, also using Pinterest and the awesome tips that site leads you to, I learned that you can use pipe insulation foam to use as a wreath!

Now, it's not a perfect circle, but it's pretty close. To make sure that you don't have the kinks with this, you just open up the slit, and tuck it in tightly, and then duct tape the ends together. The only thing that worries me with using this method, is that it'll sag, and keep sagging as the days go on. You'll see this a little later.

So I ended up getting about 4 yards of felt. This was WAY too much. It was on sale, so I figured better safe than sorry, and I'll probably end up using the extra as a tree blanket once I get a Christmas tree in here. I also decided that I wanted the wreath to be a tad more Christmasy, and a little glittery, so I also got a few fake poinsettia flowers to add to the wreath.

You want to cut three inch circles for your wreath. I used a glass which ended up making the process a lot quicker. I highly recommend that over using a paper template or something similar.
I got a lot of circles. A LOT. I decided to do it in sections to save my hands: draw, cut, pin, draw, cut, pin.

Now, to make the ruffles, you fold the circle in half, and then in half again.
And then you stick a pin at the corner of the ruffle, and then into the form. After sticking in a few pieces around the foam, fairly close together, you want to fluff them to make it nice and pretty!

In the middle of my cutting and fluffing, I had a little kitty get lost in the felt.

As far as the poinsettia's went, I just cut them off the stems and jammed them into the foam, and it worked perfectly! It also saved me from making even more ruffles because they took up some space. Now, initially, I made a little felt hook on the back of the wreath, hoping that would be the best way to hang it.
The problem with it, was that it hung way too low on the wreath hanger and you couldn't see my apartment number. So, even though it messed with the appearance of the wreath, I just put it on the hook.
 Here's a close up of the ruffles!

It took me 4.5 hours and approximately 350 circles of felt. It was a huge undertaking, but it turned out just how I wanted! Now, I'm worried about the sagging. You can already tell that it's more oblong now, and part of that might be from the weight of the felt, and hopefully it won't keep getting worse. If it does, I'll have to research a way to make it more stiff. But for now, I love it! 

Saturday, October 22, 2011

Pinterest Crafting - Fall Wreath

One of my favorite websites is Pinterest. It's a website where you can save anything you find on the web and have pictures for reference. It's great for saving craft ideas, recipes, decorating ideas, party planning ideas, and other random categories. Anything you can think of. It's also a huge community where you can search and see what other people are pinning and get ideas from them as well.

It's so helpful because it links back to the site that the pin is on, so you can get to the directions for whatever it is, or buy it if it's a product you love. It's much better than either printing ideas, or saving them in some other form on your computer. Plus, when you look at your boards, having the pictures for reference is an exciting way to be inspired.

Because of Pinterest, I've gotten really into wreaths. There are so many out there beyond Christmas ones! You can make yarn ones, spring themed ones, burlap ones, etc. I found a fall wreath that I absolutely loved that I just had to make. There's something so homey about coming home to a door with a nice festive wreath on it. Here is the link to my inspiration: Fall Wreath.

So armed with an AC Moore coupon, I headed out to buy my supplies. I bought a 14" grapevine wreath, four fake ranunculus flowers (I've recently become obsessed with the shape of them), and instead of plain berry springs, I got fake leaf and berry sprigs.

I started by cutting the ends off the flowers, but leaving a chunk of the stem so I could shove it through the wreath. I used some floral wire to try and secure it too (let's hope how I did it worked and I don't wake up to a bare wreath).

And then I broke up the leaf and berry sprigs to shove bits randomly into the other side.

And here's the completed wreath!

And here it is on my door!

Now, the only real problem is that the wreath is a tad small. It tries to hide my apartment number, but I luckily got it set so it's just barely below the peep hole so I can see the number while still seeing out my peep hole. Next wreath I make will be a bit bigger so I don't have to worry about those things, but all in all, for a simple craft project, I think it turned out well! It'll definitely make me happy to come home and see that on my door.