Saturday, November 12, 2011

Homemade Tile Coasters

I was feeling in a very crafty mood this weekend, so I referred to my Pinterest boards to decide what to make for my apartment! One thing I really needed was coasters so I could prevent condensation rings on my end tables as well as put glasses on my ottoman without them falling over.

One common pin on Pinterest is coasters made with tiles and scrapbook paper. It seemed like such a simple perfect idea! A lot of the coasters out there are not very special, but making your own with some fun paper would provide that little bit of flair to my living room. They are also good for house warming gifts or really any type of gift because you can customize them to each persons personality and decor, so it's very possible that sometime in the future, my friends will be getting some homemade coasters!

I went to Michaels to pick out my paper. That was a process! There are so many different ways you could go. You could have all of them have the exact same paper and pattern, you could get all different types of paper so they all look completely different, or you could get a paper with a different enough design that all four would look slightly different, yet very coordinated. I decided to go with the latter. It probably took me about 20 minutes to choose a paper because I couldn't decide on which one I wanted to use! There were so many patterns and so many colors, but I eventually picked out one that I absolutely love and am so excited about! I only needed one piece because I was making four coasters, and one 12x12 sheet of scrapbook paper would be plenty.

The materials you need for this are:

  • 4 tiles (4.25 x 4.25. I bought mine from Lowes and got very lucky because I found the last four in a "biscuit" color which is off white)
  • 1 piece of scrapbook paper (or however many types you want to use...but cut into 3.75 x 3.75 pieces)
  • 1 piece of felt (also cut into 3.75x3.75 pieces)
  • Mod Podge (I got the gloss version. This was my first venture with Mod Podge and I didn't realize how many different kinds there were!)
  • Clear Acrylic Sealer (I used Krylon's Triple-Thick Crystal Clear glaze, but the regular, non-triple-thick works fine too from the other instructions I've read)
  • A sponge brush (for the Mod Podge)
  • Heavy duty glue (I used Fabri-tac)

Overall, the project cost me about $20, but if you don't count the Mod Podge, sealer, and glue, which will be used for other future projects I have in mind, it's really more like $5! 

Make sure you place the tiles on some newspaper so you don't have to worry about getting Mod Podge on your carpet/hardwood/tile. You start by spreading a thin layer of Mod Podge on a tile with the sponge brush and then place one of the pieces of scrapbook paper on the tile. Make sure you push the paper down to try and get out air bubbles. Even though I did this, I will say I still ended up with one or two air bubbles. Repeat with the other three tiles.

Once the Mod Podge dries (after about 15 minutes), spread another thin layer of Mod Podge, this time on top of the paper. Make sure you get all the edges! Let the Mod Podge dry for 15 minutes. Repeat this step two more times.

Once this final layer of Mod Podge is dried, take the tiles outside, keeping them on the newspaper, so you can spray the acrylic sealer. Trust me, you do not want to do this inside, the fumes are intense! Spray the sealer about 10-12 inches away from the tiles, and make sure you cover them completely because this is what makes your coasters water resistant. You'll want to let the tiles dry for about four hours. 

Once the sealer has dried, you can bring them back inside so you can glue the felt to the bottom. The felt will keep the tiles from scratching up whatever surface you put them on because let's face it, the bottom of tiles is not as nice as the top! You can do some other variations of this, either doing a felt pad on each corner, or using cork, or some other non-slip strong medium that will protect your surface. 


And once the glue dries...you have your very own homemade coasters!! 

Wednesday, November 9, 2011

Candy Corn Chocolate Chip Cookies

Candy Corn is addictive. Once you start eating them, you can't stop. There's something in the ingredients that makes you just crave more candy corn. So even though it's a couple weeks past Halloween (the prime candy corn holiday), I found a recipe for candy corn chocolate chip cookies that was just begging for me to make it. It was a pretty extensive recipe that took two days and multiple steps. But the end result was....messy...but delicious!

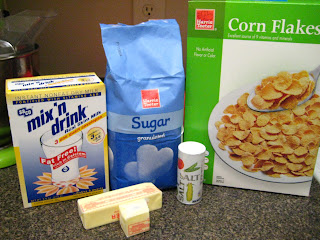
You start out by preparing the cornflake crunch. I know, cornflakes in cookies?? What insanity is this? The crunch is basically 4 cups cornflakes, 3 tbsp sugar, 1/2 cup dry milk powder, 1 tsp salt, and 10 tbsp melted butter all mixed together and then baked to sort of caramelize it.


One of the nice things about having metal measuring cups is that they also serve as good cornflake crushers.
Once the flakes are slightly crushed, add in the dry parts and mix well together.
I suggest using your hands to make sure everything is mixed well for coating. Using a spoon, the dry ingredients just sort of sit at the bottom of the bowl. After melting the butter, mix it in so that everything can coat.
Then spread out on a baking sheet, bake for 20 minutes at 275, and then let it cool for when you add it in to the cookies.
With such simple ingredients, you wouldn't think they'd create much of an aroma, but oh man, they created such a sweet smell. I don't know how to describe it, but it kind of reminded me a little of frosted flakes (one of the best cereals ever).

Now it's time to assemble the cookies!

First the dry ingredients: 1.5 cup flour, 1/2 tsp baking powder, 1/4 tsp baking soda, and 1 tsp salt. Mix them together and set it aside.

Once you have 1.5 sticks of butter (12 tbsp butter. Yea. 12.) softened, beat that with 1 1/4 cup sugar and 1/2 cup brown sugar.
Once it's light and fluffy, add in 1 egg and 1 tsp vanilla.
Then you add in the dry ingredients, and once those are mixed in, you add in the batch of cornflake crunch!

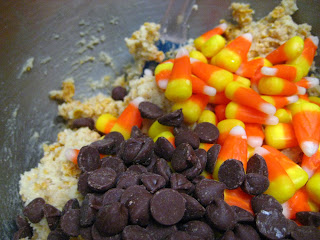
And then comes the candy corn. Ooooooh the candy corn. You only use a cup, but trust me, you only need a cup.

The recipe I was using suggested using mini chocolate chips, but I ended up going with half a cup of regular milk chocolate chips (to be honest, that was a bit of an accident. I grabbed the wrong bag and didn't realize it until I was pouring the chips into the measuring cup).


Once everything is mixed well together, you want to chill the dough for at least four hours. Now, there's a couple ways to do that, but in my opinion, the best way to do it was to scoop out the 1/4 cup sections of dough and wrap them individually so you wouldn't have to fight the dough later.

Lots of cookie dough balls...

Seeing as how it was about 10 at this point, I decided to finish the next day because I did not feel like getting up at 2am to bake cookies. I love to bake, but not that much.

So when I got home from work, I turned the oven to 375 and unwrapped the first batch of cookies. Now here is when things get....messy. The problem with the high heat is that it super destroyed the candy corn. After 15 minutes in the oven, the first batch turned out like this:
Yea. That's not pretty. They may look okay, but trust me, they weren't. I couldn't even get them off the pan that easily. There was no saving them to look like real cookies in the end.

So I decided to turn down the heat to about 325 and see if that prevented the candy corn from melting so much. I had to bake them a little longer, but it sort of helped. Not too much. The second batch at least had the cookie with the very visible candy corn piece. And I was able to get some of those off so that they still looked like cookies.


The third batch...still wasn't all that great...especially since I tried it without lining the cookie sheet. Big mistake. Trying to get those cookies off the sheet was a pain.

So in the end I had a big bowl full of cookie bits because it was almost impossible to have a total cookie survive.

But as my baking motto goes: It doesn't have to look pretty, it just has to taste good. And luckily...they tasted great. They were mega sweet so you can't eat more than like...a few sections of broken cookie, but they were fantastic all the same. Luckily I had friends to take home some, otherwise I would never finish eating them! I definitely like the idea of baking with candy corn, but I need to figure out how to keep them from melting to crystallized sugar!

Wednesday, October 26, 2011

Pecan Pumpkin Butter Bars

So I was finally able to bake for the first time in a couple of months. It definitely felt good to be back in the swing of things with my favorite hobby. And since it's fall, and one of the best things about fall is pumpkins, I decided to make some Pecan Pumpkin Butter Bars. I wait every year for Williams-Sonoma to sell their Pecan Pumpkin Butter because it makes a perfect bar! 

Since the jars are small, I usually make half the size of what I normally make for apple butter bars, so I just use an 8x8 pan. I make the same crust that I do for the apple butter bars because, let's face it, it's pretty awesome and perfect and really delicious. 

You start with flour, baking soda, and salt.

And then you add in the quick cooking oats

And then sugar, and my special addition of cinnamon!

And once you melt the butter...

You stir it in to the oat mixture to create the crust!

I packed half of the mixture onto the bottom of pan. You want to make sure it's thick enough for you to be able to pick it up and eat the bar without using a fork.

And then you take one jar of the deeeeeeeeeeeeeeeeeeelicious Pecan Pumpkin Butter and spread it across the bottom crust.

And top it with the rest of the oat mixture. You want to make sure the lightly press it into the butter because it helps to create a more solid top crust which is also better for handling.

And then after baking for an hour, it's time to eat!!

The amazing thing about these bars is the pumpkin taste is ever so slight. It's not overpowering or intense, it is just the right amount of fall in your mouth. I'm definitely a huge fan of these. And I bought two jars so that means there's another batch in my future. The ones I made this time around I'll be taking to work, so hopefully they will enjoy them!

Saturday, October 22, 2011

Pinterest Crafting - Fall Wreath

One of my favorite websites is Pinterest. It's a website where you can save anything you find on the web and have pictures for reference. It's great for saving craft ideas, recipes, decorating ideas, party planning ideas, and other random categories. Anything you can think of. It's also a huge community where you can search and see what other people are pinning and get ideas from them as well.

It's so helpful because it links back to the site that the pin is on, so you can get to the directions for whatever it is, or buy it if it's a product you love. It's much better than either printing ideas, or saving them in some other form on your computer. Plus, when you look at your boards, having the pictures for reference is an exciting way to be inspired.

Because of Pinterest, I've gotten really into wreaths. There are so many out there beyond Christmas ones! You can make yarn ones, spring themed ones, burlap ones, etc. I found a fall wreath that I absolutely loved that I just had to make. There's something so homey about coming home to a door with a nice festive wreath on it. Here is the link to my inspiration: Fall Wreath.

So armed with an AC Moore coupon, I headed out to buy my supplies. I bought a 14" grapevine wreath, four fake ranunculus flowers (I've recently become obsessed with the shape of them), and instead of plain berry springs, I got fake leaf and berry sprigs.

I started by cutting the ends off the flowers, but leaving a chunk of the stem so I could shove it through the wreath. I used some floral wire to try and secure it too (let's hope how I did it worked and I don't wake up to a bare wreath).

And then I broke up the leaf and berry sprigs to shove bits randomly into the other side.

And here's the completed wreath!

And here it is on my door!

Now, the only real problem is that the wreath is a tad small. It tries to hide my apartment number, but I luckily got it set so it's just barely below the peep hole so I can see the number while still seeing out my peep hole. Next wreath I make will be a bit bigger so I don't have to worry about those things, but all in all, for a simple craft project, I think it turned out well! It'll definitely make me happy to come home and see that on my door. 

Deep Fried Goodness

Last night after getting my new phone, Kia and I headed to the state fair. I always love going to the state fair because it's fantastic people watching, the food is delicious, and it's just a tradition you always want to partake in. We didn't feel like doing any rides or playing any games, but we did walk around, saw the ridiculously large pumpkin and watermelon, and ate really good food.

Almost every time I go to the fair, I have to get a red hot dog. I have no idea why, but I love them. I don't get them very often because not a lot of places serve them in general, so I went on a hunt for one at the fair. I found one and it was ah-mazing. After walking a bit more, we decided to stop for some deep fried goodness. I always allow myself one deep fried thing every year at the fair because you truly never get that at any other time. This year I voted to go with a deep fried Snickers. Kia got the deep fried cookie dough. I just love that melty chocolate and all the powdered sugar that ends up all over you.

After that, I was pretty full, so I didn't get any more food, but I definitely would have if I was still even slightly hungry. There's always such great and different foods at the fair. Kia was at least healthy and got some corn. I was not so healthy haha.

We watched the fireworks, which the finale ended up being overkill, and then they had an encore (which looked more like they forgot to set some fireworks off), but overall were very pretty. And after walking around some more, headed home. I think the only disappointing thing about the fair this year was that I did not see one mullet, NOT ONE! That's a rarity. I did see plenty of fanny packs though. I can't wait for the fair to come back again next year.


Welcome to the 21st Century

For so long I fought getting a smartphone. I didn't want to always be connected to my email and the internet and  I liked using my huge hard copy planner. Plus, I feel these days, we spend too much time playing with the apps on our phones, and not interacting with the people around us.

While I still believe that, as time went on, I realized just how beneficial a smartphone would be. Mostly for the navigation because I tend to get lost easily, and I still would write down directions on paper and hopefully find my way. Plus, when I'm waiting for someone by myself and it can turn into a long time, I really need something to occupy my mind.

So yesterday I went to the Verizon store and bought my very first smartphone! I debated for a minute between the new iPhone4s and the HTC Rhyme. While iPhones are super popular, get almost all the best apps first, and are super easy to use, I just couldn't bring myself to get one. I didn't like how the front screen would always have those blocks with your apps in them. I like being able to see a background image and not having my main screen feel cluttered (even though organized). And I didn't want to spend lots of money on apps.

And that led me to the HTC Rhyme. I'm not the kind of person who needs a super teched out phone. I just want something that works well, looks pretty (yes, pretty, or in other words, clean) has good features, and allows me to have awesome apps. I always liked the way HTC's looked, so when they came out with the Rhyme, it was the kind of phone that catered to me (they don't call it the lady phone for nothing).

Yes. It's purple. I love purple. It's very clean looking, the main screen is uncluttered, and I love having such an easy connection to all my Google stuff. And you know what's really awesome? I got the full Angry Birds...for free! And I now have Words with Friends! The camera is pretty decent, it has NFL Mobile (also free), and in general, it's just plain fantastic. I can use talk to text if I need to text while I'm driving (since normally that would be illegal), and it's so much easier to see my text conversations with people.

The phone came with a few extra goodies, which is nice. It came with a dock that you can put your phone in to act as a clock or music station, some tangle-free headphones, and this little charm thing that while your phone is in your purse, it can hang outside and flash when you get a call or text (told you it was a lady phone).

All in all, I'm pretty happy with my new phone. And I'm pretty excited about having moved into the 21st century! And it's a good thing I wasn't turned off by the SUPER CREEPY commercial they have for the phone.

This is the super creepy octopus lady from the Rhyme commercial. EEK!

Thursday, October 20, 2011

Apartment Meet Penny, Penny Meet Apartment

For the past three years, I had two great cats. I never realized I was a cat person until they came along. Cats are pretty low maintenance, are typically very calm, and they're very cuddly. When you get the right ones, they're super playful and overall lots of good fun. Plus they're so cute! So when they were no longer in my life, I knew I wanted and needed to get my own. It breaks my heart a little to think of "replacing" them, but I know in the end, having my own kitty will help me on this path, wherever it leads me. I'm a firm believer in the thought that pets help lower your stress level. Plus, they keep you company and will always love you (you control the food, you control the love).

So when one of my mom's friends needed someone to adopt a cat they found a year ago, I was definitely interested. The only reason they needed someone to adopt her was because their other two cats just did not get along with her because they're old and have some health issues. So she wasn't able to really come out and play all day like she needs to. She's somewhere between two and three years old, and is a Torbie (tortoise/tabby mix).

The whole time I was there to meet her, she just wanted me to pet her. She circled around me and just loved having the attention. She was so friendly to someone she just met, and didn't run scared. My kind of cat. So after a few minutes, I knew I wanted to take her home. I needed her, and with her story, I think she needed me too (not that she was in an unloving home, but she needs to be able to not have other cats picking on her).

The name they gave her was Bella, but I'm going to change it because it's just a weeeeee bit close to my niece's name. After thinking on it and asking some opinions, I decided on Penny (partly because once I get a second cat, I'm hoping to get a boy and name him Sheldon).

I got her home, and let her explore a little. At first she went around sniffing everything, finding her way around her new home. I'm sure she's confused right now. Not really sure what to think about the place. Hopefully she'll get used to it soon, I know it might take a couple days. I would post pictures, but she's hiding under my chest right now. But in the future, be prepared for random kitty stories!