I know, I know. I've been a terrible blogger. It's been months since I last wrote about something I baked or created or did, and I apologize because I'm sure so many of you have been lost without me (ha. right.). But today is a new day and it's time to get back into the swing of blogging! And first up is a Game Day Wreath!
I really have discovered a slight obsession with wreaths. I don't think my front door can ever be bare again! But hopefully after this wreath, I won't have to make one for awhile (unless someone else wants me to make one for them) because I have one for all seasons...including football!
I don't think it's any secret that I'm an NC State fan. Born and bred until the day I die. I also am a HUGE football fan. I really wanted to make a wreath to put up on my door on game days, and I've seen a bunch of rag wreaths on Pinterest and I loved the way they looked, so I thought that would be the perfect direction to take, even though I knew it would be quite the time commitment.
Finding the basic fabrics and wreath form were easy. I went with the 16 inch 4 layer-wire wreath form, and I got a yard each of white, red, and red gingham cotton fabrics. I wanted the wreath to have a little bit of a vintage feel (football is well over 150 years old!) which is why I went with the gingham for a pattern break. BUT I wasn't done yet with my fabric selection.

The dream was to have an NC State patterned fabric also in the mix, but unfortunately all the local fabric stores had no NC State fabric. Well, one had a fleece fabric, but that was not going to work for this project. So thus began the online search. There were a lot of terrible NC State fabrics. A lot of them had old logos I wasn't a fan of, and quite a few had a ton of black and I didn't really want a lot of black in my wreath...it's not "we're the RED and WHITE from State and we know we are the BEST!" for nothing! But then on eBay I found the best vintage fabric! It had the seal with the Bell Tower, and most importantly it had Tuffy, the strutting wolf logo that I LOVE.


I sat down and got to work. I cut each fabric into 1 inch by 9 inch strips. And I ended up with hundreds and hundreds of strips!
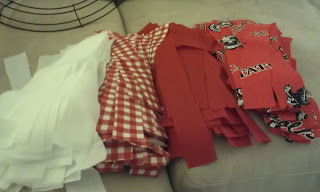
To resist any temptation to make the wreath uniform, since I really just wanted it to be a mish-mash, I tossed the strips together so I could just pull from the top as I tied them on!

With season one of Arrested Development on (side note: I am SO pumped for the new season next year!) I spent hours and hours tying. Literally. I got through half the first season (that's about 5 hours). I tied them in a square knot, starting on the inner ring and working my way to the outermost ring. There were eight "sections" in the ring so I went by section rather than row. I was kind of concerned the fabric would be too thin to stay up and not be all droopy, but when I tested a couple strips they worked perfectly!
When I was finally done, I had...THIS!

It's just so fun! And fluffy! And quite huge. I was no expecting it to be that big, but I guess using all that fabric really would have led to it. I also used one of the magnetic wreath holders because a typical wreath holder would 1) ruin the aesthetic and 2) put it at a spot that would cover my apartment number or peep hole...two things that are very important. You don't really see the NC State stuff on the specialty fabric until you're up close, but I think it's pretty obvious it's an NC State wreath! I can't wait to have this on my door on game days!!
I really have discovered a slight obsession with wreaths. I don't think my front door can ever be bare again! But hopefully after this wreath, I won't have to make one for awhile (unless someone else wants me to make one for them) because I have one for all seasons...including football!
 |
| Yes, I know this is a super old picture of the stadium, but it's one of my faves that I have |
Finding the basic fabrics and wreath form were easy. I went with the 16 inch 4 layer-wire wreath form, and I got a yard each of white, red, and red gingham cotton fabrics. I wanted the wreath to have a little bit of a vintage feel (football is well over 150 years old!) which is why I went with the gingham for a pattern break. BUT I wasn't done yet with my fabric selection.

The dream was to have an NC State patterned fabric also in the mix, but unfortunately all the local fabric stores had no NC State fabric. Well, one had a fleece fabric, but that was not going to work for this project. So thus began the online search. There were a lot of terrible NC State fabrics. A lot of them had old logos I wasn't a fan of, and quite a few had a ton of black and I didn't really want a lot of black in my wreath...it's not "we're the RED and WHITE from State and we know we are the BEST!" for nothing! But then on eBay I found the best vintage fabric! It had the seal with the Bell Tower, and most importantly it had Tuffy, the strutting wolf logo that I LOVE.


I got a yard of that fabric, so all-in-all I had four yards of fabric...and just to warn you if you're thinking of making one, yes, I did use just about all of it.
I sat down and got to work. I cut each fabric into 1 inch by 9 inch strips. And I ended up with hundreds and hundreds of strips!

To resist any temptation to make the wreath uniform, since I really just wanted it to be a mish-mash, I tossed the strips together so I could just pull from the top as I tied them on!

With season one of Arrested Development on (side note: I am SO pumped for the new season next year!) I spent hours and hours tying. Literally. I got through half the first season (that's about 5 hours). I tied them in a square knot, starting on the inner ring and working my way to the outermost ring. There were eight "sections" in the ring so I went by section rather than row. I was kind of concerned the fabric would be too thin to stay up and not be all droopy, but when I tested a couple strips they worked perfectly!
 |
| I know this technically isn't the inner ring, but I took the picture before I changed my method! |

It's just so fun! And fluffy! And quite huge. I was no expecting it to be that big, but I guess using all that fabric really would have led to it. I also used one of the magnetic wreath holders because a typical wreath holder would 1) ruin the aesthetic and 2) put it at a spot that would cover my apartment number or peep hole...two things that are very important. You don't really see the NC State stuff on the specialty fabric until you're up close, but I think it's pretty obvious it's an NC State wreath! I can't wait to have this on my door on game days!!


